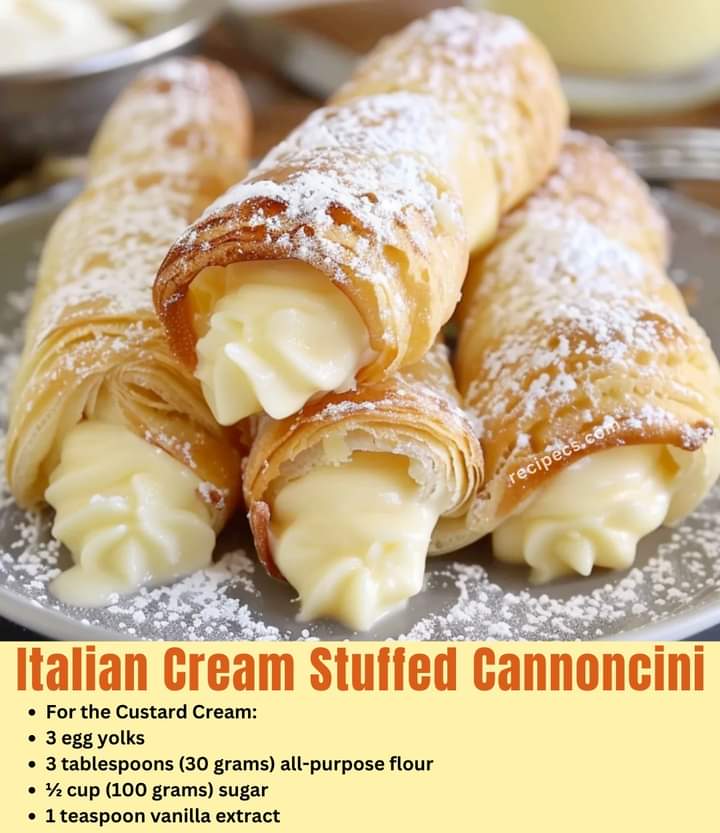
Few things in the world of baking are as universally beloved as a perfectly crafted pastry. Among these, cannoncini—a delightful Italian treat resembling small, crisp cones stuffed with luscious custard cream—stand out as a testament to both simplicity and sophistication in dessert-making. Often enjoyed as a special treat or during festive occasions, cannoncini capture the essence of Italian pastry perfection: light, flaky, and indulgently creamy.
My first encounter with cannoncini happened on a charming afternoon in a quaint Italian café while traveling through Tuscany. The café, with its rustic charm and inviting aroma of freshly baked goods, had an array of pastries displayed in glass cases. Among them were the cannoncini, their golden, flaky crusts gleaming under the soft café lights. I watched in awe as the baker filled them with creamy custard, and I couldn’t resist indulging in one. Each bite was a burst of buttery pastry and smooth, rich cream that left a lasting impression on my taste buds.
The beauty of cannoncini lies in their simplicity. They require just a few ingredients but deliver a pastry experience that’s both elegant and satisfying. Whether you’re hosting a dinner party or simply looking to treat yourself to something special, this recipe for Italian Cream Stuffed Cannoncini will bring a touch of Italian magic to your kitchen.
Ingredients
For the Custard Cream:
3 egg yolks
3 tablespoons (30 grams) all-purpose flour
½ cup (100 grams) sugar
1 teaspoon vanilla extract
8 ounces (235 milliliters) milk
For the Cannoncini:
1 sheet of puff pastry, defrosted (about 8 ounces, 225 grams)
¼ cup (50 grams) sugar
1 egg (for egg wash)
Powdered sugar for decoration
Instructions
1. Prepare the Custard Cream
a. Heat the Milk
Begin by warming the milk until it is hot but not boiling. This can be done in a saucepan over medium heat. Heating the milk helps in the smooth incorporation into the egg mixture and prevents curdling.
b. Mix the Egg Yolks
In a medium-sized mixing bowl, whisk together the egg yolks, sugar, vanilla extract, and flour. The mixture should become light and fluffy, and the sugar should be fully dissolved. This step is crucial as it creates the base for the custard cream.
c. Combine and Cook
Slowly add the hot milk to the egg mixture, whisking continuously. This gradual addition prevents the eggs from cooking too quickly and forming lumps. Once the mixture is smooth, pour it back into the saucepan.
Place the saucepan over medium heat and stir continuously. Cook until the mixture begins to thicken and reaches a slow boil. The custard should be thick enough to coat the back of a spoon. Be cautious to stir constantly to prevent the mixture from sticking to the bottom of the pan and burning.
d. Cool the Custard
Once thickened, pour the custard cream into a glass bowl. Cover it with plastic wrap, pressing the wrap directly onto the surface of the cream to prevent a skin from forming. Let it cool to room temperature before refrigerating. Chill the custard in the refrigerator for at least one hour to fully set and develop its rich flavor.
2. Prepare the Pastry Horns
a. Preheat the Oven
Preheat your oven to 400°F (200°C). This temperature is ideal for achieving a golden, crispy texture for the puff pastry.
b. Roll Out the Puff Pastry
Sprinkle a little sugar on your work surface and on top of the defrosted puff pastry. Roll it out to a rectangle approximately 9 by 12 inches. The sugar will help to create a slightly sweet, caramelized crust.
c. Cut and Shape
Cut the pastry into 12 strips, each about 1 inch wide. For easier cutting, first cut the pastry into three equal parts, then slice each part into four strips.
Wrap each strip around a cone-shaped mold, overlapping the pastry slightly (about half of the length of the strip) to ensure a sturdy, cone shape. Place the wrapped molds seam-side down on a baking sheet lined with parchment paper.
d. Egg Wash
In a small bowl, beat the egg with one tablespoon of water. Brush this egg wash lightly over the pastry cones. Be careful to avoid getting the egg wash on the mold itself, as this can make it difficult to remove the pastry after baking.
e. Bake
Bake the cannoncini in the preheated oven for about 15-20 minutes, or until they are golden brown and crispy. The baking time may vary slightly depending on your oven and the thickness of the pastry.
f. Cool and Remove
Allow the pastry horns to cool for a few minutes on the baking sheet. Gently remove them from the molds. If the pastry sticks, gently press the mold to slightly shrink its circumference and carefully twist it out of the pastry.
3. Assemble the Cannoncini
a. Fill with Custard Cream
Using a piping bag fitted with a narrow tip, fill each cooled pastry horn with the chilled custard cream. Fill them generously but avoid overfilling to prevent the cream from oozing out.
b. Garnish
If desired, dust the filled cannoncini with powdered sugar for a sweet finishing touch.
Variations and Substitutions
Flavored Custard: For a twist on the classic, you can infuse the custard with flavors like lemon zest, almond extract, or espresso. Simply add these flavors to the egg mixture before cooking.
Fruit Fillings: Add a layer of fruit preserves or fresh fruit inside the pastry before filling with custard for added texture and flavor.
Gluten-Free Option: Use gluten-free puff pastry if you need a gluten-free alternative. Ensure that all other ingredients, including the custard ingredients, are gluten-free.
Dairy-Free Custard: Substitute the milk with almond milk or coconut milk and use a dairy-free butter alternative for the pastry.
Conclusion
Italian Cream Stuffed Cannoncini are a wonderful way to bring a touch of Italian elegance to your dessert table. The crispy, flaky pastry combined with the rich, creamy custard creates a delightful contrast that is sure to impress. This recipe is a celebration of simple ingredients turned into a sophisticated treat that’s perfect for special occasions or a delightful homemade indulgence.
Preparing cannoncini might take a bit of time and patience, but the end result is well worth the effort. Each bite offers a glimpse into Italian pastry traditions and a taste of pure bliss. As you enjoy these delectable treats, you’ll not only savor their flavor but also the joy of creating something truly special from scratch. Whether you’re making them for a gathering or as a personal treat, cannoncini are sure to bring smiles and create lasting memories. Enjoy every moment of this delicious journey!