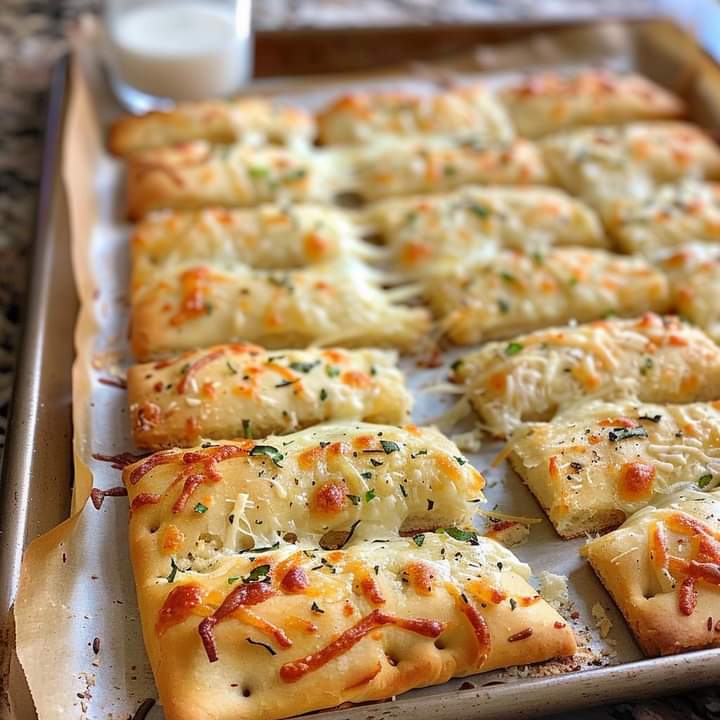
I’m thrilled to share a recipe that transforms an ordinary meal into something extraordinary—Homemade Cheesy Garlic Breadsticks. This recipe is a true winner when it comes to comfort food. Imagine warm, cheesy breadsticks fresh out of the oven, with a crispy crust and an irresistible garlic flavor that fills your kitchen with the most comforting aroma. Perfect for any occasion, these breadsticks can elevate a simple dinner into a feast or be the star of your next game night.
A Taste of Comfort and Nostalgia
Growing up, my family had a tradition of making pizza night a special event. We’d gather around the table, each of us with our own toppings and ideas, and create personalized pizzas. But no pizza night was complete without garlic breadsticks, a family favorite that always brought smiles to our faces. The smell of garlic wafting through the house and the sight of gooey melted cheese was enough to make anyone’s mouth water. It was during these cozy family gatherings that I learned the magic of garlic breadsticks—simple to make but profoundly satisfying.
Ingredients
1 (10-ounce) can prepared pizza crust
1 tablespoon butter, melted
1 clove garlic, finely minced
1/2 cup mozzarella cheese, grated
1 tablespoon Parmesan cheese
1 tablespoon dried basil
Salt and pepper to taste
Instructions
Step 1: Preheat Your Oven
Set the Temperature: Begin by preheating your oven to 425°F (220°C). This high temperature ensures that your breadsticks will bake to a perfect golden brown with a crisp exterior and a soft, cheesy interior.
Step 2: Prepare the Garlic Butter Mixture
Mix Ingredients: In a small bowl, combine 1 tablespoon of melted butter with 1 clove of finely minced garlic. This mixture will infuse the breadsticks with a rich, garlicky flavor. Stir the garlic into the butter until well combined.
Step 3: Prepare the Dough
Unroll the Dough: Open the can of prepared pizza crust and carefully unroll it onto a baking sheet lined with parchment paper. The parchment paper not only prevents sticking but also helps with easy cleanup.
Brush with Garlic Butter: Generously brush the top of the unrolled dough with the garlic butter mixture. Make sure to spread it evenly to ensure every bite is packed with garlic flavor.
Step 4: Add Cheeses and Herbs
Sprinkle Cheese: Evenly sprinkle 1/2 cup of grated mozzarella cheese over the dough. Follow with 1 tablespoon of grated Parmesan cheese. The combination of these cheeses will melt beautifully, creating a gooey, cheesy topping.
Season the Dough: Sprinkle 1 tablespoon of dried basil over the cheese. This adds a lovely herbal note that complements the garlic and cheese. Season with salt and pepper to taste. Be cautious with the salt, as both cheeses add some saltiness on their own.
Step 5: Cut the Dough
Slice the Dough: Using a pizza cutter, slice the dough lengthwise into 7 long strips. Then slice crosswise into 3 strips, creating a grid of stick shapes. The cuts should be deep enough to make separating the breadsticks easy after baking, but the strips should remain attached to each other.
Step 6: Bake the Breadsticks
Place in Oven: Place the baking sheet in the preheated oven. Bake for 10-12 minutes, or until the breadsticks are light golden brown and the cheese is melted and bubbly. Keep an eye on them towards the end of the baking time to avoid over-browning.
Step 7: Final Touches
Recut and Separate: Once the breadsticks are done baking, remove the baking sheet from the oven. Use the pizza cutter to re-slice along the pre-cut lines, separating the breadsticks. This step ensures that the breadsticks break apart easily without tearing.
Step 8: Serve Warm
Serve and Enjoy: Present your warm, cheesy garlic breadsticks on a serving platter. They are delicious on their own, but for an extra treat, serve them with a side of marinara sauce for dipping.
Variations and Substitutions
Cheese Options: Feel free to experiment with different cheeses such as Monterey Jack, Gouda, or a blend of your favorites. Each cheese will bring its own unique flavor and meltability to the breadsticks.
Herb Variations: Swap out the dried basil for other herbs like oregano, thyme, or rosemary for a different twist. Fresh herbs can also be used, but remember to add them towards the end of baking to prevent burning.
Spicy Kick: If you like a bit of heat, add a pinch of red pepper flakes to the cheese mixture or sprinkle some hot sauce over the breadsticks before baking.
Garlic Intensity: Adjust the amount of garlic to suit your taste. For a more intense garlic flavor, increase the minced garlic or add a sprinkle of garlic powder over the cheese.
Gluten-Free Option: Use a gluten-free pizza crust to accommodate dietary needs. Many stores offer ready-made gluten-free dough that works well for this recipe.
Conclusion
Homemade Cheesy Garlic Breadsticks are more than just a side dish; they are a comforting, flavorful addition to any meal. With their crispy edges, gooey cheese, and aromatic garlic, these breadsticks are perfect for warming up any cold evening or adding a touch of indulgence to your dinner. They’re simple to make, quick to prepare, and incredibly satisfying.
Whether you’re enjoying them with a hearty bowl of soup, a fresh salad, or just as a snack with marinara sauce, these breadsticks are sure to become a staple in your recipe collection. They bring together the best of homemade comfort food in a way that’s both easy and delightful. Enjoy baking, and savor every cheesy, garlicky bite!