The Ultimate Fluffy Cinnamon Rolls: A Labor of Love, Perfected
After months of trial and error, you’ve finally cracked the code on making the perfect fluffy cinnamon rolls! There’s nothing quite like the satisfaction of perfecting a recipe that brings warmth, comfort, and a deliciously sweet aroma to your kitchen. Whether you’re making them for your family, selling them, or simply indulging in a well-deserved treat, these cinnamon rolls will not disappoint. But what exactly makes these cinnamon rolls stand out? It’s not just the ingredients—it’s the care, the technique, and the love you pour into each batch.
In this article, we will explore the intricacies of this beloved recipe, diving into its background, variations, and some handy tips that will make your cinnamon rolls even better.
The History of Cinnamon Rolls:
Cinnamon rolls, also known as cinnamon buns, are a beloved pastry found in bakeries across the globe. The origins of cinnamon rolls date back to Sweden, where they are known as “kanelbullar” (kanel meaning cinnamon and bullar meaning buns). These buns have a rich history that can be traced back to the early 1920s when the Swedish home bakers began using cinnamon, an exotic spice at the time, in their pastries.
However, it wasn’t until the 1950s, when the doughnut and bakery chains in the United States began selling them on a larger scale, that cinnamon rolls as we know them became an American staple. Over the years, these rolls have evolved to include various fillings, glazes, and toppings, making them a popular breakfast treat, a snack, or a comforting dessert. The fluffy, sweet rolls that now grace your kitchen are an evolution of centuries-old recipes but have taken on a life of their own thanks to modern ingredients and techniques.

Breaking Down the Recipe:
Now that we have a bit of history under our belts, let’s talk about how to make these cinnamon rolls. This recipe brings together the ideal ratio of ingredients to ensure a dough that is soft, pillowy, and perfectly sweet, along with a gooey, cinnamon-spiced filling.
The Dough: The Foundation of Fluffiness
- 4.5 cups of bread flour: Bread flour has a higher protein content compared to all-purpose flour, which helps form gluten and creates a stronger, more elastic dough. This results in fluffy rolls with just the right chew.
- 1/4 cup of sugar: Sugar not only adds sweetness but helps the yeast thrive during fermentation.
- 1 tsp salt: Salt enhances the flavor of the dough and balances the sweetness. It also controls the yeast’s activity so that it doesn’t rise too quickly.
- Dash of cinnamon & nutmeg: These two spices add a warm, comforting aroma to the dough, making it feel like the perfect base for a cinnamon roll.
You begin by combining these dry ingredients in a mixer. The spices, sugar, and salt blend harmoniously, ensuring every bite of dough will be flavorful.
Activating the Yeast: The Magic That Makes It Rise
- 1 cup of whole milk: Whole milk contributes to the softness and richness of the dough, making it more tender.
- 2 1/4 tsp active dry yeast: The yeast is what brings the dough to life. By activating it in warm milk (110-117°F), you ensure that it blooms and works its magic, allowing the dough to rise properly. Letting it sit for 5-10 minutes ensures the yeast is fully activated, and you’re ready to move forward.
It’s crucial to not let the milk get too hot, as temperatures over 120°F can kill the yeast. The warm milk provides the perfect environment for the yeast to grow and multiply, which will result in light and fluffy cinnamon rolls.
The Eggs and Butter: Adding Richness
- 2 room-temperature eggs: Eggs are essential in doughs for enriching the texture and color of the rolls. They also add a slight custardy flavor that enhances the final result.
- 6 tablespoons unsalted butter: The butter adds a rich, tender texture to the dough, making it easy to roll and giving the cinnamon rolls a soft, melt-in-your-mouth quality.
Once the yeast mixture is activated, the eggs and butter are added to the dough, and everything is mixed together. This stage is where the magic happens. The dough may seem a bit dry at first, but trust the process—it will come together after kneading.
The Rising Process: The Key to Fluffiness
Here’s where your secret weapon comes into play—the hot water method. After mixing the dough, you place it in a greased bowl and cover it with a towel, setting it in your oven with a bowl of hot water. The warmth from the water creates a cozy environment that encourages the dough to rise evenly and beautifully. This method results in a dough that is perfectly airy and easy to work with.
Letting the dough rise for about an hour and a half, or until it doubles in size, is essential to achieving the ideal texture. The longer the dough rests, the fluffier and more tender your cinnamon rolls will be.
Rolling Out the Dough: Getting Ready for the Filling
Once the dough has risen, it’s time to roll it out. While some bakers measure exactly, you’ll eyeball the dough to create a rectangle that’s not too thin. The key is to have enough dough to work with to ensure ample filling in each roll.
- Butter: Spread a generous amount of unsalted butter over the rolled dough.
- Brown sugar & cinnamon: The brown sugar caramelizes as the rolls bake, while the cinnamon adds a depth of warmth and spice. You’re free to adjust the amount of cinnamon to suit your taste, but don’t skimp on the sugar—this is what gives the rolls that iconic gooey, sticky sweetness.
Shaping the Rolls: Cut, Don’t Roll
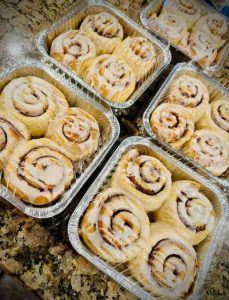
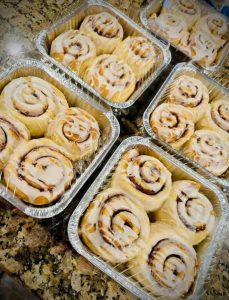
Instead of rolling the dough tightly into a log, you use a pizza cutter to cut strips. This method allows the rolls to bake more evenly and prevents them from being too tight. Placing the strips into an aluminum pan makes cleanup a breeze, especially when you’re baking in bulk or selling them.
Second Rise: Patience is Key
After arranging the rolls in the pan, you let them rise once again. This second rise is essential for achieving the fluffy texture you want. You again use the hot water method in the oven to create a warm environment, and let the rolls sit for about 45 minutes.
Baking: The Final Touch
Once the rolls have risen, you preheat your oven to 350°F and bake the rolls for 10 minutes. Then, you drizzle heavy cream over the top and bake them for an additional 12 minutes. The cream gives the cinnamon rolls a soft, gooey, melt-in-your-mouth texture that makes them irresistible.
Glazing: The Sweet Finish
The glaze is simple but effective. Made with powdered sugar, vanilla, butter emulsion (for added flavor), and just a touch of water, the glaze adds the perfect amount of sweetness and shine to the rolls. The butter emulsion, in particular, deepens the flavor, giving your cinnamon rolls a bakery-quality finish.
Tips for Success:
- Use Room Temperature Ingredients: Make sure your eggs and butter are at room temperature before mixing them into the dough. This ensures that the dough will come together smoothly and rise evenly.
- Don’t Overwork the Dough: While you need to mix the dough for a few minutes, avoid overworking it, as this can lead to tough rolls. The dough should be soft, smooth, and slightly sticky but not overly wet.
- Let the Dough Rise Properly: The key to fluffy cinnamon rolls is allowing the dough to rise properly. Make sure the dough doubles in size during the first rise, and be patient with the second rise as well. Don’t rush it—good things take time.
- Experiment with Fillings and Toppings: While this recipe calls for a classic cinnamon and brown sugar filling, you can get creative with the flavors. Add nuts like pecans or walnuts, or experiment with different types of sugar like white or maple. You could even add a layer of chocolate or caramel to elevate your rolls.
- Freezing for Later: If you want to make cinnamon rolls in advance, freeze the unbaked rolls after the second rise. When you’re ready to bake, let them thaw and rise for 30 minutes before baking them according to the recipe.
The Bottom Line:
Perfecting the art of cinnamon rolls is no easy task, but once you’ve nailed the process, it’s nothing short of magical. Whether you’re enjoying them with your family over a lazy Sunday morning breakfast or selling them to eager customers, these fluffy cinnamon rolls will always bring joy and comfort to the table. With a few simple ingredients, the right technique, and a dash of patience, you’ll be able to enjoy the best cinnamon rolls you’ve ever made—perfected at last!