Introduction
There’s something undeniably comforting about a slice of warm apple pie. It’s a classic dessert that evokes memories of home, holidays, and simple pleasures. But what if we told you there’s a way to enjoy that beloved apple pie flavor without the fuss of traditional pastry crusts and lengthy prep times? Get ready to discover a delightful twist on this timeless treat: our Tasty Apple Pie, a quick and easy pan-fried apple pie that delivers all the warmth and flavor you crave with a fraction of the effort.
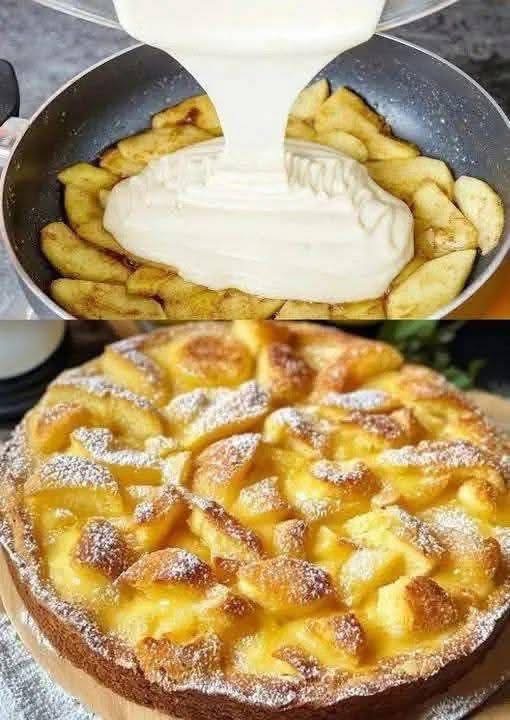
This isn’t your grandma’s apple pie, but it might just become your new favorite. What makes our Tasty Apple Pie truly special is its ingenious approach to preparation. Instead of a flaky, labor-intensive crust, we start by pan-frying the apples to perfection, allowing them to caramelize and soften, intensifying their natural sweetness and creating a rich, deep flavor profile. This simple step not only speeds up the cooking process but also adds an incredible depth that sets this pie apart.
Once the apples are beautifully browned and tender, they’re lovingly blanketed with a creamy, custardy batter that bakes up into a golden, tender cake-like topping. The result is a harmonious blend of textures and tastes: sweet, caramelized apples nestled beneath a soft, rich topping, all dusted with a delicate veil of powdered sugar. It’s a wonderfully satisfying dessert that comes together quickly, making it perfect for a weeknight treat or an impressive last-minute dessert for guests. Prepare to fall in love with the ease and incredible taste of this unique apple pie!
Nutritional Information
Per serving (approximate values):
- Calories: 320
- Protein: 4g
- Carbohydrates: 45g
- Fat: 15g
- Fiber: 3g
- Sodium: 180mg
Ingredients
- 4-5 medium apples (about 2 lbs), such as Granny Smith, Honeycrisp, or Fuji, peeled, cored, and sliced 1/4-inch thick
- 1/4 cup unsalted butter
- 1/2 cup granulated sugar (for apples)
- 1 teaspoon ground cinnamon (optional, for apples)
- 1/2 cup all-purpose flour
- 1/2 cup granulated sugar (for batter)
- 1 teaspoon baking powder
- 1/4 teaspoon salt
- 1 large egg
- 1/2 cup whole milk
- 2 tablespoons melted unsalted butter (for batter)
- 1 teaspoon vanilla extract
- Powdered sugar, for dusting
Instructions
- Prepare the Apples: Peel, core, and slice your apples into uniform 1/4-inch thick pieces. This ensures even cooking.
- Pan-Fry the Apples: In a large, oven-safe skillet (preferably cast iron, 10-12 inches) over medium heat, melt 1/4 cup of unsalted butter. Add the sliced apples to the skillet in a single layer if possible. If your skillet is too small, cook them in two batches to avoid overcrowding, which can steam rather than caramelize them.
- Caramelize the Apples: Sprinkle 1/2 cup of granulated sugar and the optional 1 teaspoon of ground cinnamon over the apples. Cook, stirring occasionally, for 8-12 minutes, or until the apples are tender-crisp and beautifully caramelized with a golden-brown hue. Remove the skillet from the heat and arrange the apples evenly across the bottom.
- Preheat Oven and Prepare Baking Dish (if not using oven-safe skillet): If your skillet is not oven-safe, transfer the caramelized apples to a 9-inch pie plate or similarly sized baking dish and spread them evenly. Preheat your oven to 375°F (190°C).
- Prepare the Batter: In a medium mixing bowl, whisk together the all-purpose flour, 1/2 cup granulated sugar, baking powder, and salt. Make sure there are no lumps.
- Combine Wet Ingredients: In a separate small bowl, lightly beat the large egg. Then, whisk in the whole milk, 2 tablespoons of melted unsalted butter, and vanilla extract until well combined.
- Combine Wet and Dry: Pour the wet ingredients into the dry ingredients. Stir gently with a whisk or spatula until just combined. Be careful not to overmix; a few small lumps are fine. Overmixing can lead to a tough batter.
- Pour Batter Over Apples:Carefully pour the prepared batter evenly over the pan-fried apples in the skillet or baking dish. Gently spread the batter to cover all the apples, but avoid disturbing the apple layer too much.
- Bake the Pie: Transfer the skillet or baking dish to the preheated oven. Bake for 25-35 minutes, or until the top is golden brown and a toothpick inserted into the center of the batter comes out clean. The batter should be set and spring back lightly when touched.
- Cool and Serve: Once baked, remove the pie from the oven and let it cool in the skillet or baking dish on a wire rack for at least 10-15 minutes. This allows the pie to set further and makes it easier to serve.
- Dust with Powdered Sugar: Just before serving, dust generously with powdered sugar using a fine-mesh sieve. Serve warm or at room temperature.
Cooking Tips and Variations
To ensure your Tasty Apple Pie turns out perfectly every time, here are some essential cooking tips. For those who love to experiment, we’ve also included some delicious variations to inspire your culinary creativity.
Tips for Best Results:
- Choose the Right Apples: The type of apple you use can significantly impact the pie’s flavor and texture. For a balance of sweetness and tartness that holds its shape well during cooking, opt for varieties like Granny Smith, Honeycrisp, Fuji, Gala, or Braeburn. A mix of two apple types can also add complexity.
- Don’t Overcrowd the Pan: When pan-frying the apples, it’s crucial not to overcrowd the skillet. If there are too many apples in the pan, they will steam instead of caramelize, preventing them from developing that rich, deep flavor. Cook them in batches if necessary, ensuring a single layer.
- Achieve Proper Caramelization: Cook the apples until they are tender-crisp and have a beautiful golden-brown caramelization. This step is key to the pie’s flavor. Don’t rush it! Stir occasionally to ensure even browning.
- Avoid Overmixing the Batter:When combining the wet and dry ingredients for the batter, mix until just combined. Overmixing can develop the gluten in the flour, leading to a tough and rubbery texture. A few small lumps in the batter are perfectly acceptable.
- Check for Doneness: The best way to tell if your pie is fully baked is to insert a toothpick into the center of the batter. If it comes out clean, the pie is done. The top should also be golden brown and the edges lightly puffed.
- Cool Before Slicing: While it’s tempting to dig in immediately, letting the pie cool for at least 10-15 minutes allows the custardy batter to set properly. This makes for cleaner slices and a better overall eating experience.
- Dusting with Powdered Sugar:Wait until the pie has cooled slightly before dusting with powdered sugar. If you dust it while it’s piping hot, the sugar can melt and disappear into the surface, creating a sticky glaze rather than a delicate dusting.
Variations:
- Spice It Up: While cinnamon is a classic choice, feel free to experiment with other warm spices. Add a pinch of nutmeg, allspice, cardamom, or a blend of pumpkin pie spice to the apples or the batter for an extra layer of flavor.
- Nutty Crunch: For added texture and flavor, sprinkle a handful of chopped walnuts, pecans, or almonds over the apples before pouring in the batter. The nuts will toast lightly during baking, adding a delightful crunch.
- Berry Delicious: Substitute a portion of the apples with other fruits. A cup of fresh or frozen (not thawed) berries like blueberries, raspberries, or sliced peaches can be added to the apples before the batter is poured, creating a wonderful fruit medley.
- Citrus Zest: Grate a teaspoon of lemon or orange zest into the batter to brighten the flavors and add a subtle zing.
- Brown Sugar Batter: For a deeper, more molasses-like flavor in the batter, substitute half or all of the granulated sugar in the batter with light brown sugar.
- Creamy Topping: For an even richer topping, consider adding 2-3 tablespoons of sour cream or Greek yogurt to the batter. This will make the batter slightly tangier and more moist.
- Individual Servings: Instead of one large pie, you can divide the apples and batter into individual ramekins or a muffin tin for mini apple pies. Adjust baking time accordingly (likely 15-20 minutes).
Storage and Reheating
Proper storage and reheating ensure your Tasty Apple Pie remains as delicious as when it first came out of the oven.
Storage:
- Countertop: If you plan to consume the pie within 1-2 days, you can store it at room temperature, loosely covered with plastic wrap or aluminum foil. Ensure it’s in a cool, dry place.
- Refrigerator: For longer storage, or if your kitchen is warm, refrigerate the pie. Cover it tightly with plastic wrap or transfer slices to an airtight container. It will keep well in the refrigerator for up to 3-4 days.
- Freezer: While best enjoyed fresh, this pie can be frozen. Once completely cooled, wrap individual slices or the entire pie tightly in plastic wrap, then an additional layer of aluminum foil. Freeze for up to 1-2 months. Thaw in the refrigerator overnight before reheating.
Reheating:
- Oven: This is the best method for reheating, as it helps restore the pie’s texture. Preheat your oven to 300°F (150°C). Place individual slices or the whole pie on a baking sheet. Reheat for 10-15 minutes for slices, or 20-25 minutes for a whole pie, or until warmed through.
- Microwave: For a quick reheat, individual slices can be warmed in the microwave. Heat on medium power for 30-60 seconds, or until warm. Be aware that the crust may become softer and less crisp than when reheated in the oven.
- Skillet (for individual slices):For a crispy bottom, you can gently reheat individual slices in a dry non-stick skillet over medium-low heat for a few minutes until warmed through and the bottom is slightly crisp.
Frequently Asked Questions
Why are my apples still hard after baking?
There are a few reasons your apples might still be hard. First, ensure you’re using apples that are suitable for baking and soften well (like Granny Smith or Honeycrisp). Second, make sure you’ve pan-fried them long enough to tenderize them before adding the batter. They should be tender-crisp at that stage. Finally, ensure your oven temperature is accurate and the pie has baked for the full recommended time, or until a toothpick comes out clean.
Can I use frozen apples for this recipe?
While fresh apples are preferred for the best texture and flavor, you can use frozen sliced apples. However, you’ll need to thaw them completely and drain any excess liquid before pan-frying. This extra moisture could make the apples soggy and prevent proper caramelization. You may also need to adjust the pan-frying time slightly.
What can I serve with this apple pie?
This Tasty Apple Pie is delicious on its own, but it’s even better with a complementary topping. Classic choices include a scoop of vanilla bean ice cream (the cold, creamy contrast is divine!), a dollop of freshly whipped cream, or a drizzle of warm caramel sauce. For a touch of sophistication, a sprinkle of toasted pecans or a light dusting of cinnamon can also elevate the presentation and taste.
Can I make this recipe ahead of time?
Yes, you can certainly prepare this Tasty Apple Pie ahead of time. It tastes excellent served warm or at room temperature. You can bake it a day in advance and store it as instructed above. If you want to serve it warm, simply reheat it in the oven before serving. For the best flavor and texture, we recommend baking it no more than 1-2 days before you plan to serve it.