Introduction
Imagine the sizzle, the rich aroma, and that first tender, juicy bite. A perfectly cooked T-Bone steak is the epitome of steakhouse luxury, and now you can master it in your own kitchen. This iconic cut, featuring both a tenderloin (filet mignon) and a New York strip separated by its signature T-shaped bone, offers a delightful duality of textures and flavors. It’s a showstopper that promises an unforgettable meal, whether you’re celebrating a special occasion or simply treating yourself to something extraordinary.
Many home cooks shy away from cooking a premium steak, fearing they won’t achieve that restaurant-quality sear and ideal doneness. But with the right techniques and a little confidence, creating a masterpiece is entirely within your reach. This recipe strips away the mystery, focusing on simple, yet crucial steps that guarantee a flavorful, perfectly cooked T-Bone every time. We’ll guide you through selecting the best cut, seasoning it to perfection, and mastering the high-heat sear that locks in all those incredible juices.
Get ready to impress yourself and anyone lucky enough to share your table. Our foolproof method prioritizes quality ingredients and precise execution, ensuring a steak that’s beautifully crusted on the outside, tender and juicy on the inside, and infused with rich, savory flavors. Forget expensive steakhouse bills; your ultimate T-Bone experience starts right here, at home.
Nutritional Information
Per serving (approximate values):
- Calories: 750-850
- Protein: 70-80g
- Carbohydrates: 2-5g
- Fat: 50-60g
- Fiber: 0-1g
- Sodium: 800-1200mg
Ingredients
- 2 T-Bone steaks, 1.5 to 2 inches thick (approximately 1.5-2 lbs each)
- 2 tablespoons coarse sea salt (or kosher salt)
- 1 tablespoon freshly ground black pepper
- 2 tablespoons olive oil (or high smoke point oil like avocado oil)
- 4 tablespoons unsalted butter, divided
- 4 sprigs fresh rosemary or thyme (optional, for basting)
- 2 cloves garlic, smashed (optional, for basting)
- 2 tablespoons fresh chives, finely chopped, for garnish
Instructions
- Prepare the Steaks: Remove the T-Bone steaks from the refrigerator at least 45-60 minutes before cooking. This allows them to come closer to room temperature, promoting more even cooking. Pat the steaks thoroughly dry with paper towels. Excess moisture on the surface prevents a good sear.
- Season Generously: Season both sides and the edges of each steak liberally with coarse sea salt and freshly ground black pepper. Don’t be shy; a good crust relies on ample seasoning. Press the seasoning gently into the meat.
- Preheat Your Cooking Surface:If using a cast iron skillet, place it over high heat for 5-7 minutes until it’s smoking lightly. For grilling, preheat your grill to its highest setting (500-600°F or higher) with a direct heat zone. The key is to get the cooking surface screaming hot.
- Add Oil: If using a skillet, add 2 tablespoons of olive oil to the hot pan. Swirl to coat the bottom. If grilling, you can lightly brush the steaks with oil or oil the grates directly with a paper towel dipped in oil.
- Sear the Steaks (Skillet Method): Carefully place the seasoned steaks into the hot skillet. You should hear an immediate, aggressive sizzle. Sear for 2-3 minutes per side for a deep, dark crust. Do not move the steaks during this initial sear.
- Sear the Steaks (Grill Method):Place the steaks directly over the hottest part of the grill. Close the lid if possible to retain heat. Grill for 2-3 minutes per side to achieve prominent grill marks and a good sear.
- Reduce Heat and Baste (Skillet Method): After searing both sides, reduce the heat to medium-low. Add 2 tablespoons of unsalted butter, rosemary/thyme sprigs, and smashed garlic cloves to the pan. Once the butter melts and the herbs/garlic become fragrant, tilt the pan slightly and use a spoon to continuously baste the melting butter over the top of the steaks for 3-5 minutes, or until desired doneness is reached.
- Finish Cooking (Grill Method):After the initial sear, move the steaks to a cooler part of the grill (indirect heat zone) if available, or reduce the heat on your direct zone. Close the lid and continue to cook, flipping occasionally, until the desired internal temperature is reached.
- Check for Doneness: Use an instant-read meat thermometer inserted into the thickest part of the steak, avoiding the bone.
- Rare: 120-125°F (50-52°C)
- Medium-Rare: 130-135°F (54-57°C) – Recommended for T-Bone
- Medium: 135-140°F (57-60°C)
- Medium-Well: 145-150°F (63-66°C)
- Rest the Steaks: Transfer the cooked T-Bone steaks to a cutting board. Immediately place the remaining 2 tablespoons of unsalted butter on top of each hot steak. Tent loosely with aluminum foil and let them rest for 10-15 minutes. This crucial step allows the juices to redistribute throughout the meat, ensuring a tender and moist steak.
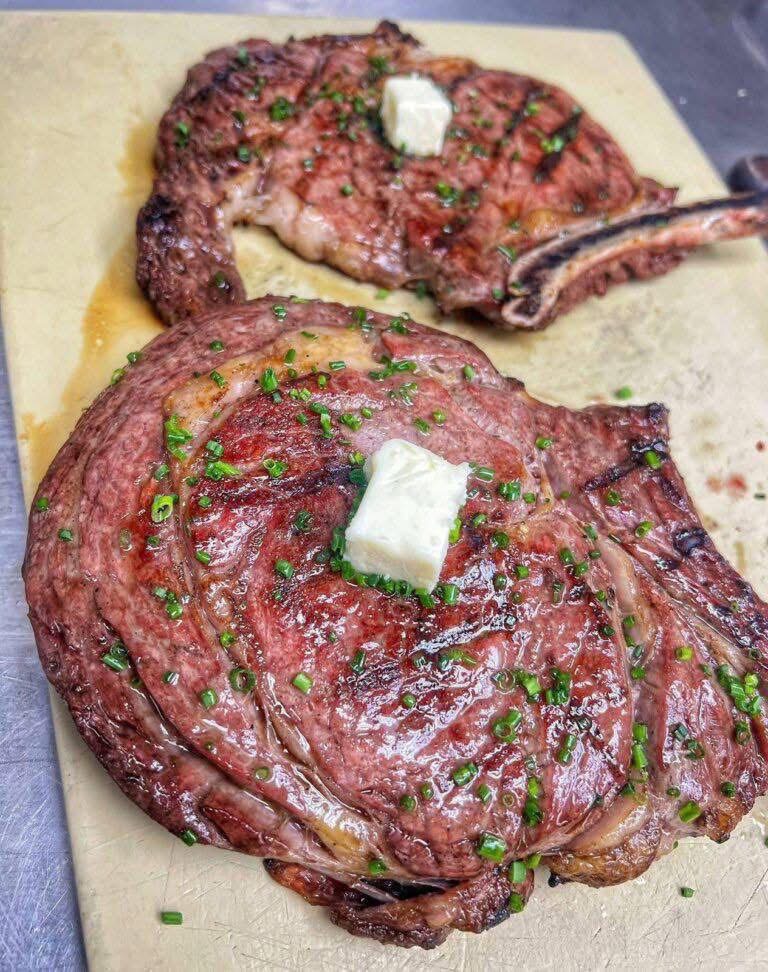
- Garnish and Serve: After resting, slice the steak off the bone, then slice against the grain into thick pieces. Sprinkle generously with fresh chopped chives. Serve immediately with your favorite side dishes.
Cooking Tips and Variations
Achieving steak perfection is a journey, and these tips will help you along the way. First and foremost, always start with a high-quality T-Bone steak. Look for good marbling – those little streaks of fat throughout the meat – as this translates directly to flavor and tenderness. Aim for steaks that are at least 1.5 inches thick; thinner steaks cook too quickly, making it difficult to achieve a good sear without overcooking the interior. Don’t be afraid to ask your butcher for a well-marbled cut.
The “pat dry” step is non-negotiable. Any moisture on the surface of your steak will steam rather than sear, preventing that beautiful, crispy crust we’re aiming for. Use plenty of paper towels and ensure the surface is completely dry before seasoning. Speaking of seasoning, be generous with your salt and pepper. Much of it will fall off during cooking, so a liberal application ensures maximum flavor penetration. For an extra layer of flavor, consider adding a pinch of garlic powder or onion powder to your seasoning blend.
When it comes to searing, patience is a virtue. Resist the urge to move the steak once it hits the hot pan or grill. Let it sit undisturbed for the recommended time to develop that deep, dark, flavorful crust known as the Maillard reaction. Flipping too early or too often will prevent this from happening. For the best grill marks, ensure your grates are clean and well-oiled before placing the steak down.
A meat thermometer is your best friend for perfectly cooked steak. Guessing doneness by feel (the “poke test”) is a skill that takes years to master, and even then, can be inconsistent. An instant-read thermometer takes all the guesswork out, ensuring you hit your desired temperature every time. Remember to pull the steak off the heat a few degrees below your target, as it will continue to cook during the resting period.
The resting step is just as important as the cooking itself. When meat cooks, the muscle fibers contract, pushing juices to the center. Resting allows these juices to redistribute throughout the steak, resulting in a much more tender and moist bite. Cutting into a steak too soon is the number one mistake that leads to dry, tough results. Be patient, let it rest, and you’ll be rewarded.
For variations, consider a compound butter. Before cooking, combine softened unsalted butter with minced garlic, fresh rosemary, thyme, and a pinch of salt. Form into a log, wrap in parchment paper, and chill. Slice off a pat to melt over the hot rested steak. This infuses the steak with incredible herb and garlic flavors. You could also experiment with a reverse sear method: cook the steaks in a low oven (250°F / 120°C) until about 10-15°F below your target internal temperature, then finish with a very quick, high-heat sear on both sides in a screaming hot pan or grill. This method can lead to an incredibly even doneness from edge to edge.
Pair your T-Bone with classic steakhouse sides like creamed spinach, roasted asparagus, garlic mashed potatoes, or a simple crisp green salad with a vinaigrette. A robust red wine like a Cabernet Sauvignon or Merlot makes an excellent beverage pairing.
Storage and Reheating
While T-Bone steak is undeniably best enjoyed fresh off the rest, sometimes you might have leftovers. To store cooked steak, allow it to cool completely to room temperature (no more than 2 hours) before placing it in an airtight container. Refrigerate promptly for up to 3-4 days. For longer storage, you can freeze cooked steak. Wrap individual portions tightly in plastic wrap, then an additional layer of aluminum foil, and place in a freezer-safe bag or container. It will keep well for 2-3 months, though quality may slightly diminish over time.
Reheating steak can be tricky, as it’s easy to overcook it and dry it out. The goal is to warm it through gently without cooking it further. The best method for reheating a T-Bone is in a low oven. Preheat your oven to 250°F (120°C). Place the leftover steak on a wire rack set over a baking sheet. Heat for 15-25 minutes, or until the internal temperature reaches about 110-120°F (43-49°C). This slow, gentle heat will warm the steak without drying it out. If you desire a bit of a crust, you can quickly sear it in a hot skillet with a tiny bit of butter for 30-60 seconds per side after oven reheating.
Alternatively, you can slice the cold steak thinly and gently warm it in a pan with a little butter or beef broth over medium-low heat. This is a good option if you plan to use the steak in a stir-fry, sandwich, or salad, as it minimizes the risk of overcooking. Avoid reheating steak in the microwave, as it tends to make the meat tough and rubbery.
Frequently Asked Questions
What is the difference between a T-Bone and a Porterhouse?
Both T-Bone and Porterhouse steaks come from the short loin of the cow and contain a T-shaped bone separating a New York strip on one side and a tenderloin (filet mignon) on the other. The key difference lies in the size of the tenderloin. A Porterhouse steak has a significantly larger tenderloin section, typically at least 1.25 inches thick at its widest point, while a T-Bone’s tenderloin is smaller, usually between 0.5 and 1.25 inches thick. Essentially, a Porterhouse is a larger T-Bone.
How do I know when my steak is medium-rare without a thermometer?
While a meat thermometer is highly recommended for accuracy, you can estimate doneness using the “poke test.” Gently press your thumb to your pinky finger and feel the fleshy part of your palm below the thumb – this is roughly what a well-done steak feels like. For medium-rare, press your thumb to your middle finger and feel that part of your palm; it should feel soft with a slight spring. This method takes practice and can be inconsistent due to steak thickness and individual perception, which is why a thermometer is always the best tool.
Why is resting the steak so important?
Resting is crucial because when meat cooks, its muscle fibers contract, squeezing the internal juices towards the center. If you cut into the steak immediately after cooking, these juices will rush out, leaving you with a dry, less flavorful steak. Resting allows the muscle fibers to relax and reabsorb those juices, redistributing them evenly throughout the meat. This results in a significantly more tender, moist, and flavorful steak. Don’t skip this step!
Can I cook a T-Bone steak from frozen?
While it is possible to cook a steak from frozen using specific methods (like the reverse sear), it is generally not recommended for a premium cut like a T-Bone if you’re aiming for optimal results. Cooking from frozen makes it much harder to achieve a good, even sear and can lead to an unevenly cooked interior. For the best flavor and texture, always thaw your T-Bone completely in the refrigerator before cooking, and then bring it to room temperature as described in the recipe.